Talking Taiko

April 6, 2010

Laban, movement, and taiko drills

Filed under: Drills, Mechanics and movement — Tags: , , — Wynn Kiyama @ 9:42 am

The next couple of posts will refer to the dancer, choreographer, and dance/movement theorist, Rudolf Laban and his book The Mastery of Movement (1971, originally published in 1950).

According to Laban, some dancers prefer highly rhythmic music with corresponding rhythmic movements, while others prefer “the free, irregular unfolding of time-rhythm” (135). He observes that legs and feet often respond best to regular rhythms, but he instructs the dancer to train his or her feet, arms, and hands, so that they are “equally able to express the qualities of a free time-rhythm.” Laban adds: “In fact, the whole body should be able to express the regular and irregular vibrations and waves of movement” (135).

In taiko, most of our pieces utilize a steady basebeat (ji), and the rhythms we play directly correspond to the underlying ji. Everything is, or should be, precise and in time, and we train our muscles to perform rhythmically. This training produces strong performers and tight ensembles, but at the same time, it could lead to stiff and jerky movements. We need to cultivate independence of arms and a sense of flow that is not necessarily dependent upon the ji. In many cases, particularly in Sukeroku or bon odori styles, one arm will sweep around the drum while the other strikes the drum head. While the striking arm needs to be in-time, the sweeping arm should free itself from any strict sense of rhythm. One arm needs to feel a steady pulse, and the other arm needs to acknowledge that pulse but move in a (mostly) non-rhythmic manner. Here are two drills that might help.

1. With the chu daiko on the floor or on a beta stand, play steady notes with the right arm (ideally with a metronome). The left arm should join the right in unison on every second note. Once you’re comfortable, the left arm should play every third note. Consciously increase the arc of extension and move the left arm at a slightly slower pace. Then play every fourth note, again increasing the arc and moving slower. Switch arms.

2. With the chu daiko in the same position, play steady notes with the right arm. Sweep the left arm in a large counter-clockwise circle, starting very slowly and gradually getting faster, then slower. etc. The whole time, the right arm should continue to play the steady notes without change. Switch arms.

April 5, 2010

Taiko in Maine

Filed under: All Else — Tags: , — Wynn Kiyama @ 9:22 am

It’s strange. For the past two months, I’ve been spending all of my time playing, teaching, and talking about taiko, and at the same time I’ve completely neglected this blog. I hope to fix that.

In late January, I drove up to Waterville, Maine to start my artist residency at Colby College. I’m offering a seminar called Taiko: Music, Movement, and Meaning. It meets once a week, and we spend our time discussing issues from the assigned readings and learning at the drum. We’re planning a group performance at the end of the semester (5/6), and each student will also be responsible for a short research project. I thought it’d be useful to create an online resource for taiko drummers in Maine, so we’ll be conducting interviews and writing articles for our blog Taiko in Maine.

On Thursdays, I also work with the student-run Colby Taiko Group. This club was initiated by Dr. Tamae Prindle, a professor in the East Asian Studies department and a loyal supporter of the group. She acquired PVC taiko and bachi from Mr. Naoto Kobayashi, received a grant in order to purchase 3 chu daiko and a shime daiko, convinced her husband to build taiko stands, and she recently sewed bags for all the new chus!

In early March, KIOKU performed at MIT and Colby. It was really great to play with Chris and Ali again, and the music department chair Steven Nuss hosted a wonderful post-concert party. Through the performance, I was also able to meet and chat with Jesica Chang, who writes for the student newspaper. If you’re interested, you can quickly peek at some of their taiko-related articles: here, here, and here.

Meanwhile I’ve been meeting with the different taiko groups in Maine. I had lunch with Naoto Kobayashi, who leads the Hall-Dale High School Taiko Group and plays in the Maine Taiko Dojo. I’ll be lending a hand later in April as he builds his PVC taiko. This past Saturday (4/3), I gave a workshop to the dedicated and enthusiastic drummers of the Bowdoin Taiko Group. The weather was beautiful, so we played outside on the quad in our bare feet. It was pretty amazing. I visited with the Maine Taiko Dojo and had a wonderful meal afterwards at Shima, co-owned by one of the MTD drummers. Towards the end of the semester, I’ll be meeting with the Bates Taiko Group. I have a final performance for the Colby baccalaureate ceremony with Kaoru Watanabe and some of my students, and then it’s back to NYC.

It’s been an amazing experience thus far and I’ve learned a lot about taiko and teaching taiko. I hope to share some observations in the very near future. I promise.

October 16, 2009

Sword, snake, and bell tower

Filed under: Drills, Mechanics and movement — Tags: , , , , — Wynn Kiyama @ 10:50 am

With one primary teacher, or sensei, a taiko group can achieve uniformity in kata and style. In this way, I’ve often been impressed by Japanese wadaiko groups and North American taiko groups with a sensei. But for those of us who function without a main teacher or repertoire with a singular approach, the question of kata and style is more complex.

In Soh Daiko, we are blessed with a varied repertoire representing different styles and techniques. We need to recognize this fact and alter our playing style depending on the piece (and the decisions made by the practice committee and song captain). This is easier said than done, and as I implied in an earlier post, taiko players do not readily change their playing style. No doubt this is due to bodily habits that are difficult to change, but when you think about it for just a second, you’ll realize that we really are obligated to adjust our style when playing a varied repertoire. After all, why would you use Sukeroku style when playing Chichibu Yatai Bayashi? Why use Osuwa style when playing Miyake?

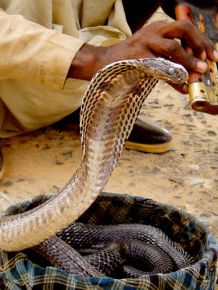
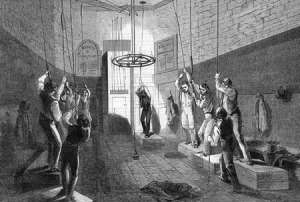
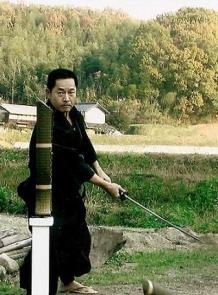
Now, people’s habits are locked into their bodies and I don’t expect to unlock everything in two weeks (or two months or even two years). However, I hope to make people aware of their habits and offer them real alternatives. This coming practice, I will ask everyone to perform a basic rhythmic pattern (with the taiko on the ground, drumhead up) using three different techniques: sword, snake, and bell tower. While the actual hitting mechanism is the same or similar in all three techniques, the pull-back and wind-up are drastically different. I am consciously avoiding actual group names, styles, or teachers for two important reasons: (1) I am not officially schooled in these styles and do not claim to teach in these styles, and (2) I don’t want people to be influenced, either positively or negatively, by what they think they know about certain styles. Therefore, I’m using descriptive terms that, I hope, are evocative, easy to remember, and useful. Remember, these are exercises in awareness and bodily change. I am not advocating for any of these approaches per se.

TAMESHIGIRIsmall2 No wrist adjustment as you raise your arm. Slight reach away from the body. Slice down.

Snake-Charmer Adjust the wrist with a slight rotation as you raise your arm. The arm is fluid and flexible.

bow_bells No wrist adjustment as you raise your arm. Pull the bachi down.

Update: As predicted, I wasn’t able to get everyone to immediately change their playing style. There are a few people who are completed locked into their bodily habits and either are reluctant to change or unable to change without a full mechanical overhaul. In general, these were the players with little experience (and minimal bodily awareness) or players who trained for an extended period of time or from an early age with a Japanese wadaiko group (and, by repetition, have concretized a single style in their body). I wish I could overhaul these players, but our dojo time is too precious and I need to continue with our itinerary. I pointed out some of these “locked habits” to the other practice leaders and hopefully they’ll work on them in the coming year.

I introduced each of the three general styles (sword, snake, bell tower), and we tried out a simple rhythmic pattern using each style. Then we started switching from style to style. Afterwards, we played a different pattern from our repertoire and I asked two members to sit out, watch, and diagnose each player as exhibiting the sword, snake, or bell tower style. After the pattern was done, I asked each individual member to self-diagnose and then we heard the diagnosis from the two outside members. Some surprise and some confirmation.

I’m not sure if this exercise will have lasting value, but it seems to have done at least three things: (1) we’re becoming aware of our bodily habits, (2) we now have a vocabulary for describing and diagnosing these habits, and, (3) we realized that our left and right arms are often noticeably different. One member was described as a snake with her right arm and a sword in her left. Another was described as a bell tower with a small snake at the apex (slight cocking of the wrist). Others were just swords or bell towers. Actually, the whole exercise was kind of fun and, after a little review, might lead to better awareness and taiko execution. We’ll see. Next week, we’ll apply these “styles” to the slant stand (snake, bell tower) and odaiko (sword, bell tower).

One final update: My month as practice leader is over now. I haven’t spoken with many members of Soh Daiko about the efficacy of the drills (sword, snake, bell tower), but I hope to get some feedback soon. During October, we had to prepare for one group performance and two small-group performances, and I handed over one practice to a practice leader in training. All in all, I’m sure the drills would have been more effective had I had more time. But I guess that’s the perennial complaint.

Pros: I think some people became aware of their playing tendencies and now we have a vocabulary to describe the different nuances of technique. Perhaps some individuals will consciously attempt to change. I’ve already noticed some practice leaders picking up on the vocabulary in order to attain more uniformity.

Cons: I don’t think we spent enough time drilling and reviewing the different techniques. For some individuals, these drills will soon be forgotten and they will resume their previous playing style. That’s not necessarily a tragedy, although I had hoped to increase our individual and group adaptability.

Conclusion (for me): More than likely, I will only attempt one single style with the Colby student group. If they are beginners, it will be most beneficial for them to learn one style well, rather than introduce various styles. With the bell-tower technique, they’ll have a strong foundation for hitting efficiently, using speed, and relaxing.

October 13, 2009

Relaxed arms and roller coasters

Filed under: Drills, Mechanics and movement — Tags: , , — Wynn Kiyama @ 11:31 am

Let’s start in a comfortable standing position with our feet shoulder-width apart. Your arms should be hanging naturally. Gently twist your body and watch your arms. They should be swaying back and forth in a nice, relaxed manner. Now, completely let go of the arms. Deaden them. Pretend like your arms are dead weight, uncontrollable, and just hanging there at your sides.

The first thing we’re going to attempt is to get our arms in the air (in front of us) without the use of our arms. You’ll probably need to bend your knees, sway backwards just a bit, and then throw your arm up into the air with your torso. Try the right side and then try the left. Soon, you’ll notice that the arm slows and feels a bit weightless at the apex, at the top of its path. Keep that feeling of weightlessness at the apex. R, L, R, L.

It’s kind of like a roller coaster. Right now, my personal favorite is Kingda Ka at the Six Flags in New Jersey. But any roller coaster will do. Once you reach the apex, there’s a brief moment of weightlessness, full of potential energy, right before the drop. Check out this footage, especially between 1:05-1:07:

Let’s return to our arms. After that moment of weightlessness, the arm comes down pretty quickly with a fair amount of energy (just like the roller coaster). Since this energy is already there, let’s use it to our advantage.

Approach the drum (down on the ground with the drumhead facing up), get into your comfortable stance, and let’s recreate the dead arms. R, L, R, L. Now pick up your bachi and let’s again do the dead arms with a very slight squeeze of the fingers (grip) at the point of impact. Remember the feeling of weightlessness at the apex and the energy that is already inherent in your arms. R, L, R, L. It’ll look a little chaotic and untamed, but we’re not looking for a beautiful hit right now. Rather, we want to retain that feeling of weightlessness when we have bachi in our hands.

Now, let’s return to our normal hitting style—whatever that may be for you and your group. Let’s simply add that feeling of weightlessness at the apex to our normal hitting style. So, raise your arm, once your reach the apex let your arm go (make it weightless like that moment of the top of roller coaster), and then let if fall with a slight squeeze of the fingers for the hit. R, L, R, L. This should be easy on the body.

Finally, for this exercise, let’s give the arm a little push on its way down. Imagine you’re at the top of a snow-covered hill and you just give a little push to your friends on the sled. A little push is all you need to get them moving quickly. So, notice how your elbow is already leading the arm down. For a quick reminder, return to the dead-arm exercise and watch the mechanics as your torso heaves the arm upward and gravity brings it downwards. Watch the elbow.

Give the elbow a little energy on its way down. Drop it. Give it a little speed. The trick here is keeping the arm always relaxed as you guide the arm motion with this dropped elbow. The arm should fall even faster and, with the slight squeeze at the moment of impact, should produce a nice (and I mean, nice) hit. This “don” should sound really beautiful.

To summarize: roller coaster arms at apex, drop the elbow with guided and relaxed speed, slight squeeze.

PS. For Soh Daiko members (keeping in mind our “core” style), we’ll want to make sure we are reaching away from our body as our arms rise. In the future, we’ll also want to connect the dropping of the elbow with an initial thrust of our ki.

PPS. Using the roller coaster in one last image, you can consider the entire arm mechanics as the roller coaster train. The front of train is the elbow, which reaches the apex first and is the first to start going down. The back of the train is the tip of the bachi, and benefits by being last—it moves the fastest and contains the most energy. And, most importantly, that’s why you should always sit in the back of a roller coaster.

October 9, 2009

Acknowledgments

Filed under: All Else — Wynn Kiyama @ 11:31 am

After my last post, I started to think about my other favorite taiko videos, pieces, performers, and teachers. This list would be way too long to compile right now, but at the very least, I’d like to acknowledge two special performers and teachers.

John Ko was a long-time member of Soh Daiko and a master diagnostician, something like the Chef Gordon Ramsay or Gregory House of taiko. He didn’t take formal lessons with anyone, but he voraciously watched every video he could get his hands on and carefully studied the mechanics of taiko movement. Many of my ideas and observations are indebted to our late-night conversations up in the temple or on the sidewalk after rehearsals. In particular, I’ve been using his concept of the “Bell Tower” for some time now. These days, he is devoting his time to photography, but whenever I get a chance to see him play, I am reminded how great taiko really is.

Seriously, Tosha Kiyonari of the Nihon Taiko Dojo is a character straight out of a Miyazaki film. He is funny, sarcastic, crass. Not only that, he is one of the most beautiful taiko players I’ve ever seen. He has an exacting ear and stresses the importance of a beautiful (rather than “dirty-ful”) sound. His style involves an ingenuous use of the wrist, which for the most part, remains perpendicular to the drumhead without the 90 degree rotation (pulling back with the wrist so the palm faces the drum) you often see in other Sukeroku styles. His style is applicable to any body type and is geared towards acquiring that beautiful sound.

October 6, 2009

Group/individual and change

Filed under: Practice, Rehearsals — Tags: , , , — Wynn Kiyama @ 9:44 am

Every taiko group eventually develops its own style based on the training and direction of the sensei or main teachers, or through active group decisions. Soh Daiko developed its core style through long relationships with Sensei Seiichi Tanaka, Reverend Mas Kodani and Kinnara Taiko, San Jose Taiko, Russell Baba, Reverend Ron Miyamura, and Kodo. In general terms, the playing style is strong, clean (with sharp movements), and to be honest, perhaps a little rigid. But from the perspective of the audience, this rigidity can look pretty impressive.

Taking a closer look, however, you’ll notice that each drummer has unique habits. Choose five random drummers in Soh Daiko and you’ll find five similar but appreciably different approaches to the core style. In addition, there are members of Soh Daiko with previous training in the Sukeroku or Nihon Taiko Dojo schools. Elements of these styles—particularly the fluid and flexible movements—have been adopted by a few members, but in an inconsistent manner. This leads to a familiar question: how do you achieve group solidarity (a definitive style, agreement in kata) with a roomful of individual drummers?

If there is a sensei or main teacher, the answer is quite easy. You, as an individual drummer, should adapt your style immediately. It would be disrespectful to insist upon your previous training when in a new environment. If the group is run collectively, however, the answer is not as obvious. Decisions concerning kata and execution must be made within each piece and drills should be developed to naturalize the new or old movements. This post is not exactly about making these executive decisions. Rather, I want to take a step backwards and address a more basic question: can taiko drummers change their style?

In my experience, it is extremely difficult to get taiko drummers to alter their style. No doubt, this is due to the bodily habits accumulated through years of playing or simply living. Unless we are paying close attention to ourselves, these habits will be automatic, unrecognized, or simply categorized in our minds as this-or-that style. In fact, we have to acknowledge that these habits might just be bad habits. In order for us to address the first question concerning group style, we have to figure out how to alter our individual bodily habits. In other words, decisions about the group will be fruitless unless each drummer can actually change.

The task at hand, then, is getting drummers to change.

During my month as practice leader, I will first be addressing the basic hit, stance, and kata. Soon afterwards, however, I will be attempting to get drummers to change. Rather than prescribe a single style or goal, I will attempt to get each drummer to perform basic patterns in three different styles (which for now, I am calling Sword, Snake, and Bell Tower). We, as drummers, have all experienced instruction based on a prescribed singular style. Three different styles might actually wake people up and allow them to compare, adjust, and assess. Ultimately I am hoping to provoke wakefulness, bodily awareness, and engagement. We’ll see if it works or not…

PS. If you want to see an example of the “fluid and flexible movements” I mentioned earlier, check out this video labeled “Wadaiko [S]ukeroku.” This is one of my all-time favorite taiko posts on Youtube.

September 21, 2009

Leading practice 3

Filed under: Practice, Rehearsals — Tags: , — Wynn Kiyama @ 5:51 pm

Yuudachi. Written by Sanford Ikeda, this composition utilizes the Chichibu Yatai Bayashi pattern as its centerpiece with an overall arrangement strongly influenced by early Kodo compositions. Due to its extreme dynamic range, this piece works best in indoor concert settings. The lead shime and kane part requires someone who is steady, can keep the front drummers from rushing, and can drive the group forward during solos and the final Chichibu pattern. The front drummers should look as uniform as possible, and the soloists should be confident.

Rehearsal techniques:
1. Practice the Chichibu pattern on up-stands. You can alternate with one side providing the backup part (do-kon), drill it as a duet (like the odaiko players in the piece), or change tempos after each successive pattern. Three to five times through the pattern.
2. Practice the Chichibu pattern on down drums. You can watch for uniformity between the three front drummers while others learn the pattern. Watch from the side to see the angle of everyone’s bachi in the raised position. Stress using the lower body to make it look stronger and more fluid. Watch from the front to get the audience view.
3. Solos. Encourage the soloists to build a “story” within their solo with a clear beginning, middle, and ending.

Hachidan. Arranged by Jenny Wada and Peter Wong, this composition is based on Oedo Sukeroku’s Yodan Uchi. The basic elements were taught to Soh Daiko by Seiichi Tanaka of the San Francisco Taiko Dojo, and Jenny and Peter took on the task of arranging it for eight drum sides. Apparently, they figured out the end jumps at a restaurant, with salt and pepper shakers, napkins, and utensils for performers.

Rehearsal techniques:
1. Practice the Hachidan middle pattern. Watch for uniformity. Make sure everyone is executing the “reverse turn” as cleanly as possible. When in doubt, go back to basics and review the “2 basic, turn, 2 basic.” There has been an ongoing discussion as to how “smooth” we perform the basic movements. In other words, should we strive for Sukeroku-style movements or do we retain the Soh Daiko tradition of sharper movements.
2. Don’t ignore the backline (cannon, shime). Listen for the backups during the duet and the crescendo during the “mixed threes.”
3. Solos. Introduce basic movements and have people develop a short solo. You can split the group into two or three Yodan Uchi setups and all soloist switch on the cannon cue.

Miyake. This arrangement is based on Kodo’s arrangement of the traditional Miyake Daiko. The smooth arm movements and easy glide initiated by the feet and legs are replaced with stronger and sharper movements. This piece requires a good deal of endurance, so it should be practiced regularly. The piece was taught to SD by Kodo members during their first tour (as Kodo) to New York. Ask Merle about their sleeping arrangement at the New York Buddhist Church.

Rehearsal techniques:
1. It helps to have two performers on each position. Swap in different performers as you run the piece. Make sure the transitions (before and after each solo) are working.
2. With the drums down the line, have everyone play the Miyake pattern or the duet pattern. Watch for uniformity in the hits, pull back, and ending position. Make sure people aren’t leaning too far forward or back. The pull back should seem exciting—it should look and feel like an archer pulling back the bowstring. The movement should be initiated with the legs and the torso and arms should follow. A game of tug-of-war might help get the right feeling.

Matsuri. The basic elements were taught to Soh Daiko by Sensei Seiichi Tanaka. SD’s arrangement has continually changed throughout the years and involves solos (including shime and odaiko), Teddy’s handstand entrance, twirl, and solo (always a big crowd-pleaser), and the end jumps.

Rehearsal techniques:
1. Place all the drums on slant stands, down a line, and watch for uniformity. This is a tough one to rehearse, as everyone plays it slightly differently. Once a decision has been made about kata, drill the pattern over and over again.
2. Practice the end jumps. But please don’t overdo it and risk injury.
3. Listen for agreement between the odaiko and shime throughout the piece. Make sure the kane, chappa, and shekere are contributing to the base beat.

Shishimai. The group has been performing two different arrangements recently. Both were based on workshops with Kenny Endo, but the newer arrangement sticks closer to the original with three performers in the hayashi (shime, kane, fue).

Rehearsal techniques:
1. Kuchi shoga with the different patterns. The hayashi can spend time in the dressing room working on their parts. It would be best if two different hayashi were developed.
2. Make sure the shime introduction is strong. Nimba should sound light and bouncy. Make sure the shime and kane are ‘swinging’ to the same extent. The Yatai section again should be strong and confident. Finally, Mikoshi Bayashi should not sound strident or angry. Make sure the shime is playing fast and light!

September 18, 2009

Leading practice 2

Filed under: Practice, Rehearsals — Wynn Kiyama @ 1:04 pm

As I noted in the previous post, there are countless ways to run an effective rehearsal. What I didn’t mention was the fact that there are countless way to run a terrible rehearsal. Here are some things you might want to avoid:

Too much talking. Every minute you open your mouth means a minute of non-drumming. I know it’s fun to chat about taiko and some people seem inclined to preface a two-minute exercise with five minutes of explanation. But if you are the practice leader and you’re just talking, you’re not doing your job. Any extended period of non-drumming should be considered a failure on your part.

Simply running through a piece is not an effective use of time. Unless you are doing a dress rehearsal for an upcoming performance, running a piece without any direction will embed and concretize bad habits. Ultimately, this will make your job harder.

It is your job to fix things, so don’t ignore sloppy execution or problematic sections. Before the rehearsal, identity two “problem” spots within each piece. Come up with a short exercise to fix it (short demonstration and then exercise, kuchi shoga while air-drumming, pairing up, or something else), quickly tell the group what you’re hoping to fix, and then run the exercise. Once that is done, run a larger section to see if the group retains the fix. If not, you’ll need to come up with a better exercise or turn this exercise into a repeated drill at the beginning of rehearsals.

Don’t get exasperated. Don’t tell everyone they “just need to practice” and don’t say, “We’ll continue to work on this or that.” If you tell the group to practice on their own, you might as well wish for the next set of lottery numbers while you’re at it. Anything that you do not directly address during a rehearsal will remain the same. Problems will still be problems. And in most cases, if you say we’ll continue to work on things, it means, “I’m going to ignore this problem for now.” If you really want something fixed, it has to be done during your rehearsal.

Don’t dwell unnecessarily, especially when it comes to choreography. Some groups have highly choreographed pieces with movement or jumps. Pinpoint what you want to fix and then fix it in a short amount of time. Please do not make your drummers execute the same jump over and over again. You are risking injury.

As you can probably tell, I’m a bit of a taskmaster during my rehearsal months. But whether you are performing in a community group, temple group, semi-professional group, or professional group, one thing remains the same: everyone likes to play well. It is your responsibility, then, to make the group play well together. You don’t have to be dictatorial (which might make people resentful) or use a “teacher” voice (which might make people revert to their inner bad student). In fact, it’s best if you let your personality guide your rehearsal. Don’t take on a different persona when you are leading the group—it will seem funny, artificial, or just annoying to everyone else. Be yourself, and by that I mean, be yourself when you have something important to accomplish.

Leading practice 1

Filed under: Drills, Rehearsals — Tags: , , — Wynn Kiyama @ 11:37 am

We are starting to develop new practice leaders for Soh Daiko and this post will address some rehearsal strategies. All of the current practice leaders have an individual style and set of priorities and, of course, there are countless ways to run an effective rehearsal. What follow are simple suggestions regarding overall rehearsal structure and drills. In the third post, I will discuss rehearsal strategies for actual pieces.

Overall structure of your rehearsals
In Soh Daiko, we have short rehearsals (Thursday evenings), longer rehearsals (Saturdays), and “no-sound” rehearsals (certain Saturdays). Plan accordingly and always remember to keep your talking to a minimum. Directions should be precise.

Short rehearsals: In general, people can focus well for a limited amount of time. After we bow in, stretch, and take out the drums, we usually have 90 minutes to play. For these rehearsals, you might consider starting with drills (15 minutes), and playing three pieces from the repertoire (25 minutes each). Given this short amount of time, you will only be able to address and fix two small “problems” within each piece. Ideally, you will pinpoint and foreshadow these problems in the drills.

Longer rehearsals: Here, you can run pieces multiple times or play through an entire program along with transitions. Think in bigger terms: Is the piece working as a whole? Is the kata consistent among all the performers? Are there particular moments in the piece that sound fuzzy or unclear? How are the transitions between pieces? Does the program work?

I would still advocate addressing only two problems within each piece, but these problems can be larger in scope. In other words, you could focus on the overall kata of a repeating pattern (Matsuri pattern, Hachidan middle pattern, Miyake pattern), the overall kata of a particular section (Matsuri jumps, Hachidan intro or jumps, Shishimai), the strength and structure of solos, or timing issues. For these rehearsals, you might consider longer drills (30 minutes), and four or five pieces from the repertoire (30-35 minutes each). In exceptional cases, you can spend 45 minutes on a single piece, but don’t do this too often. Attention starts to waver after an extended amount of time. If you really want to spend time on a single piece, make sure to come up with distinct drills in short chunks of time, and then put it all together with a final run-through of the piece.

No-sound rehearsals: These rehearsals are a little bit more difficult to plan and you’ll notice that people will feel a little less satisfied drumming on pads for an entire afternoon. However, you should use this time to the group’s advantage. Avoid working on strength or power. Instead turn your attention to timing issues, kata, learning new positions, working on solos, or transitions. You could use these rehearsals to keep us on top of every piece in the repertoire, and in this way, you might consider drills (30 minutes), and every piece from the repertoire (20-25 minutes or so).

Drills
Coming up with imaginative drills can be fun, but remember that drills should sharpen our minds and bodies. Ideally a drill will address one particular issue (of course, touching on others at the same time): individual and group timing, strength, technique, or memorization of a pattern. If you have to spend a lot of time explaining the drill, it’s probably not worth the effort. There may be exceptions—for example, an extended timing drill that you’ll consistently use throughout the year—but I would advocate the “old” stand-by drills with one clear direction before starting (“Let’s focus on _____”).

Renshu: As I’ve mentioned before, I love this drill. It focuses on basic technique and reveals any problems with the doro-suku. If the group slows down during the doro-suku section, it means that this basic drumming technique is not working. You can always beneficially practice the doro-suku (strong hit; immediate relaxation of the grip and wrist; smooth and successful pull-back).

Repertoire patterns (Chichibu, Hachidan, Matsuri): These drills can always be employed to reinforce memorization, build endurance, and group kata. You can double the effectiveness of your drill by having different people play the time-keeping instrument (cannon, kane, or lead shime). If you know who will be performing this part, go ahead and have them play it. They will become more accustomed to the position, will learn how to lead the group, and will be able to pinpoint any deficiencies in their playing (more than likely, their left hand). Of course, you could have other people play the time-keeping instrument as well so that they understand the position and its relation to the other parts. After all, everyone in a taiko group should be able to play a consistent straight, swing, and horse beat.

Timing patterns, technique patterns: All fine, but make sure they are effectively addressing a basic issue.

Overall structure of the drills
Please consider the order and drum-layout of your drills. Minimize the amount of time and movement between each drill. In other words, if you start with drums on the up-stand, do all the drills in this position before moving to another position. This will save you one minute, which may not seem like a lot, but any effective practice leader will take advantage of that extra minute.

For Soh Daiko, I would recommend starting with drums on the up-stands (allowing for the most number of available drum heads). Do Renshu, Chichibu pattern, Hachidan X-pattern, Oroshi or timing drills. Then slightly turn the drums and do the Hachidan middle pattern. Then, if you have time, place the drums down on the mat and do another drill, or switch to slant or Miyake stands. During the drill section, everyone should be drumming as much as possible. Aim for 13 minutes of drumming during any 15-minute section.
July 2, 2009

Toes

Filed under: Mechanics and movement — Tags: , , , — Wynn Kiyama @ 1:05 pm

Moving from one drum to another or moving around a single drum is best accomplished on the toes or the balls of the feet. Like a boxer or a martial arts practitioner, using this base allows the taiko drummer to move in different directions with ease. This is also the best foundation for drumming in a stationary position.

Sometimes you’ll see drummers lifting their toes while rocking back on their heels. This usually happens when a drummer wants to increase the distance from the drum (for a powerful ‘don’) without effort and without feeling a stretch in the body. This strategy may work, but it disrupts balance and does not provide any power through the body. If you keep your toes on the ground, you’ll feel a stretch from your base, up through the body all the way to the tip of your bachi (like a bow being pulled back). This stretch automatically produces a great deal of “potential” energy, and when released, results in a powerful and beautifully-executed hit. You can lift your heel if need be (especially with the back foot), but keep the toes and the balls of your foot on the ground.

If you habitually raise your toes, try these exercises on the odaiko:

1. As you raise and pull your right arm back, consciously keep your left foot (toes/balls of foot) grounded. Do the same with your left arm and right foot. R (arm) L (foot), L (arm) R (foot), RL, LR, RL, LR, etc.

2. Focus on keeping your front foot (usually left) grounded as you alternate with both R and L hits.

3. Concentrate on the entire movement: arm pulls back; clench slightly to protect your lower back while relaxing and lengthening the torso; provide a solid base with the toes and balls of your foot; at the point of greatest extension, thrust your ki (center) towards the drum; this will propel the arm forward; since your shoulder and arm are relaxed, speed will provide the power for the hit; grip or squeeze at the moment of the hit; relax.

If you still raise your toes after these exercises, try playing with slightly raised heels all the time. This will be quite a workout for your calves, but without the possibility of rocking on your heels, your toes/balls of your foot will start to get the idea.

PS These observations are applicable to most styles of taiko drumming. But Okinawan eisa drumming is a different matter (as the heel participates in a more active way) and I’m sure there are other Japanese regional styles that use the heel.

Older Posts »

Create a free website or blog at WordPress.com.